Editado el 11 de octubre de 2013 para incluir información sobre colores usados.
Edited on october 13, 2013 to include information about color used.
Hola amigos, después de un verano sin hacer maquetas, retomo esta afición y el blog, con esta entrada dedicada a explicar cómo resuelvo el empolvado de vehículos militares.
Existe una gran cantidad de técnicas y materiales para conseguir un empolvado realista. De todas ellas, la que yo prefiero es el empolvado con óleos fundidos en seco (sin apenas disolvente). Al final de la entrada explico las ventajas que, en mi opinión, tiene este enfoque.
Hello friends, after a summer without making models, I am resuming this hobby and blog, with this post dedicated to explaining how to solve the problem of applying dust to military vehicles.
There are a number of techniques and materials for a realistic dust. Of these, the one I prefer is to blend oils using solvent hardly. At the end of the post I explain the advantages which, in my opinion, has this approach.
Herramientas
Primero veamos las herramientas necesarias. Son necesarios cuatro pinceles:
- Un pincel muy fino, completamente seco, para aplicar pequeños puntos de óleo sobre la maqueta. Este pincel se mantiene siempre seco, nunca se moja en disolvente.
- Un pincel pequeño de cerdas cortas y duras, completamente seco, para fundir los óleos.
- Otro pincel pequeño plano para humedecer ligeramente los bordes de la mancha de óleo. Este pincel se usa con muy poco disolvente (esto es muy importante, apenas debe tener disolvente).
- Un pincel plano de cerdas largas y suaves, completamente seco, para difuminar la mancha.
También se puede usar un trozo pequeño de esponja, si se quiere un acabado punteado.
Tools
First, let see the necessary tools. Four paintbrushes are needed:
- A fine brush, completely dry, to apply small dots of oil on the model. This brush is always kept dry.
- A small brush of short, stiff bristles, completely dry, to melt the oils.
- Another small flat brush to lightly moisten the edges of the oil slick. This brush is used with very little solvent (this is very important, use the solvent hardly).
- A flat brush with long and soft bristles, completely dry, to blend the stain.
You can also use a small piece of sponge, if you want a stipple finish.
Proceso
En primer lugar, la superficie sobre la que se aplica el óleo debe ser mate o semi satinada, nunca completamente brillante. Sobre superficies completamente brillantes no funciona este método.
Process
First, the surface on which you apply the oils should be matte or semi-glossy, never completely glossy. This method does not work if the surface is completely glossy.
A continuación se aplican pequeñas cantidades de óleo con el pincel número 1. La intensidad del empolvado depende de la cantidad de óleo que se aplique. Así se pueden conseguir distintos acabados, desde un empolvado suave a un empolvado muy intenso.
Then apply a small amount of oil with the brush number 1. Powdering intensity depends on the amount of oil applied. So you can get different finishes, from smooth to a very intense Powdering.
Con el pincel número 2, se mezclan los óleos. Este pincel está seco por lo que la mezcla es en seco.
With the brush number 2, I blend the oils. This brush is dry so the blending is dry.
Este paso es opcional. Si los bordes de la mezcla son muy duros, se humedecen con el pincel número 3 ligeramente humedecido en disolvente white spirit. Es muy importante no encharcar los óleos con disolvente. El pincel debe estar casi completamente seco.
This step is optional. If the edges of the blending is very hard, moistened slightly with the brush number 3 dipped in white spirit solvent. It is very important not to puddle solvent oils. The brush should be almost completely dry.
Por último, con el pincel número 4, se difuminan los bordes para conseguir un aspecto más realista.
Finally, with the brush number 4, blur the edges to get a more realistic look.
Es importante no aplicar el empolvado sobre todo el carro a la vez, sino proceder por zonas.
It is important to proceed by parts, not all the model at once.
En todo momento se puede retocar el empolvado aplicado en un instante anterior. Fíjese en el cambio sutil de color alrededor del anillo de la escotilla del comandante.
At any time you can retouch the dusty applied in an instant before. Note the subtle change of color around the commander's hatch.
Por supuesto, el método se puede aplicar no sólo a las superficies horizontales, sino que también se puede aplicar a las superficies verticales.
Of course, the method can be applied not only to the horizontal surfaces, but also can be applied to vertical surfaces.
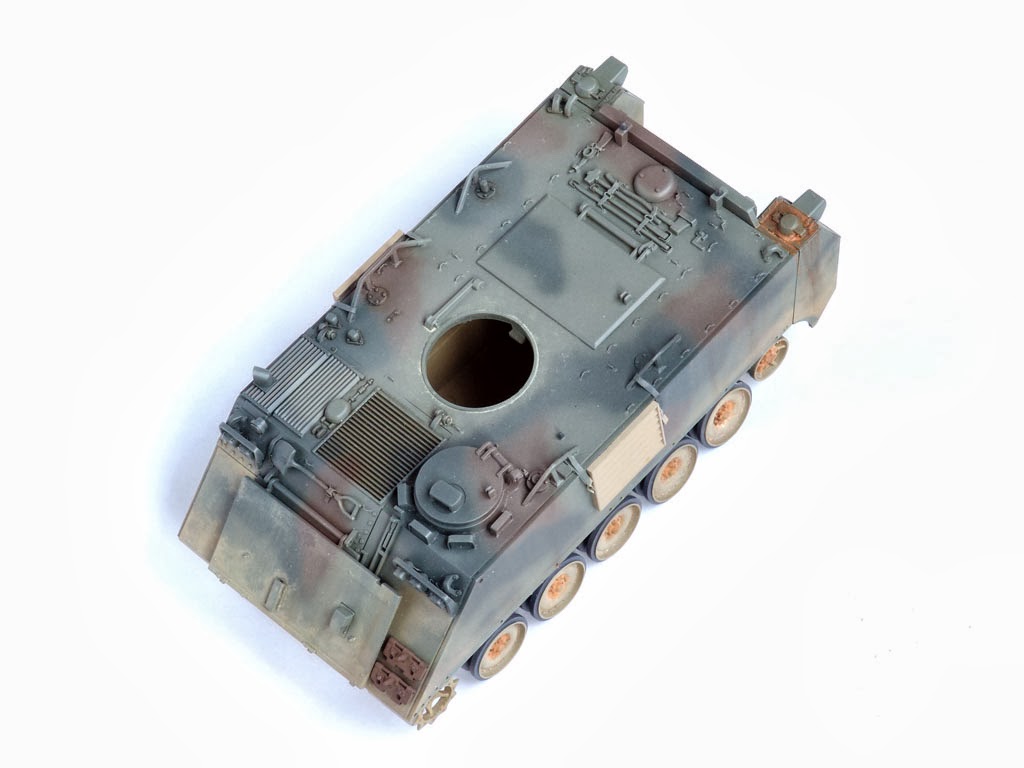
Aquí podemos ver el resultado de esta fase. Es importante darse cuenta de que el aspecto final del carro se obtiene mediante la superposición de capas de diferentes técnicas y efectos. Con esta técnica, por sí sola, no se obtiene unos resultados satisfactorios.
Here we can see the result of this phase. It is important to realize that the final appearance of the model is obtained by overlapping layers of different techniques and effects. With this technique alone does not achieve satisfactory results.
Colores que he usado
Para este modelo, he usado los siguientes colores:
- Amarillo de Nápoles claro, ref. 222, de Rembrandt. Este color funciona muy bien sobre carros de color claro. Sobre carros oscuros, hay que usarlo con cuidado porque queda bastante blanquecino. Yo lo he usado porque quería un empolvado intenso y para eso es ideal.
- Buff, ref. Abt. 035, de 502 Abteilung. Este color funciona fenomenal sobre carros oscuros, sobre todo si el preempolvado se ha hecho con color Buff de Tamiya (XF-57). Se puede aplicar sin miedo. Sobre carros de colores claros, apenas si se nota, pero también da buenos resultados.
- Amarillo de Nápoles verde, ref. 282, de Rembrandt. Este color queda fenomenal sobre carros oscuros ambientados en invierno, sobre todo en terrenos nevados. Da como resultado ese empolvado semi grisáceo tan chulo y característico de los ambientes invernales / nevados. En este modelo lo he aplicado moderadamente, para dar variedad cromática al resultado.
- Ocre amarillo claro, ref. 228, de Rembrandt. Este color queda anaranjado. Queda fenomental sobre todos tipo de carros, tanto claros como oscuros. Da bastante color, por lo que hay que usarlo con cuidado. Sobre carros oscuros, yo lo uso moderadamente, para dar variedad cromática al resultado.
Colors that I've used
For this model, I used the following colors:
- Naples yellow light, ref. 222, from Rembrandt. This color works well on light colored tanks. On dark tanks, use it with care because it is quite white. I used it in my M-113 because I wanted a heavy dusting effect.
- Buff, ref. Abt. 035, from 502 Abteilung. This color works great on dark tanks, especially if the pre dusting has been done with Tamiya Buff (XF-57). It can be applied without fear. On lighter colored tanks is barely noticeable, but also gives good results.
- Naples yellow green, ref. 282, from Rembrandt. This color looks great on dark tanks set in winter, especially on snowy terrain. In this model I have applied moderately, to give variety to the resulting color.
- Yellow ochre light, ref. 228, from Rembrandt. This color is orange. It looks awesome on all kinds of tanks, both light and dark. You have to use it carefully. On dark tanks, I use it moderately, to give variety to the resulting color.

Por supuesto, que el empolvado se puede hacer con otros colores. Yo recomiendo que cada uno pruebe con los colores que tenga a mano y use aquellos que mejor se adapten a sus gustos y a los resultados que se quieran obtener.
Of course, this effect can be done with other colors. I recommend that everyone try the colors you have on hand and use those that best suit your taste and the results to be obtained.
Conclusiones
- Una de las ventajas de este método, es que en todo momento, el color final que se obtiene es el que se está viendo. Es una técnica WYSIWYG (What You See Is What You Get / Lo que ves es lo que obtienes).
- Es un método que permite retoques y correcciones incluso varios días después de su aplicación. Esto permite observar detenidamente el carro en los días posteriores para detectar y corregir posibles fallos.
- Es un método increíblemente fácil de aplicar, lo que lo hace muy indicado para modelistas principiantes e intermedios.
- La gama de efectos que se puede conseguir con este método es muy amplia, desde un empolvado muy sutil hasta un empolvado muy intenso. Esto lo hace muy apropiado para todo tipo de teatros de operaciones.
- Se puede usar un trozo de esponja de baño con muy poco disolvente white spirit, para conseguir un acabado punteado. Para ello hay que dar golpecitos suaves verticalmente sobre el óleo para retirar pequeños puntos de pintura.
Conclusions
- One advantage of this method is that at all times, the final color obtained is being viewed. This is a WYSIWYG technique (What You See Is What You Get).
- It is a method that allows adjustments and corrections even several days after application. This allows to look closely the model in the days following to detect and correct faults.
- It is a method incredibly easy to apply, making it very suitable for beginner and intermediate modelers.
- The range of effects that can be achieved with this method is very wide, from a subtle dusting to a very intense dusting. This makes it very suitable for all kinds of theaters of operations.
- You can use a piece of sponge bath with little white spirit solvent, for a stipple finish. This is done by gentle tapping on the oil vertically to remove small dots of paint.
¿Te ha parecido útil o interesante este post? Recuerda que tus comentarios siempre son bien recibidos.
Do you find this post helpful or interesting? Remember, your comments are always welcome.